Getting Started with Arduino
Begin your journey into the world of Arduino with this comprehensive guide covering the basics of Arduino hardware, software, and programming concepts.
What is Arduino?
Arduino is an open-source electronics platform based on easy-to-use hardware and software. It's designed for anyone making interactive projects.
Perfect for Beginners!
Arduino is designed to be accessible to everyone, regardless of their electronics or programming experience. You can start creating amazing projects with just basic knowledge!
Your First Arduino Kit
Before diving into the exciting world of Arduino, you'll need some basic equipment. We've put together a comprehensive starter kit that includes everything you need:

Why This Kit?
This kit includes all the essential components you'll need for your first projects, carefully selected to ensure compatibility and ease of use. It's the perfect way to start your Arduino journey!
The Arduino IDE: Your Creative Workshop
The Arduino IDE (Integrated Development Environment) is where the magic happens. It's your digital workshop for writing and uploading code to your Arduino board.
The IDE is available for Windows, Mac, and Linux, making it accessible to everyone regardless of their operating system preference.
Here's a glimpse of what your first Arduino code might look like:
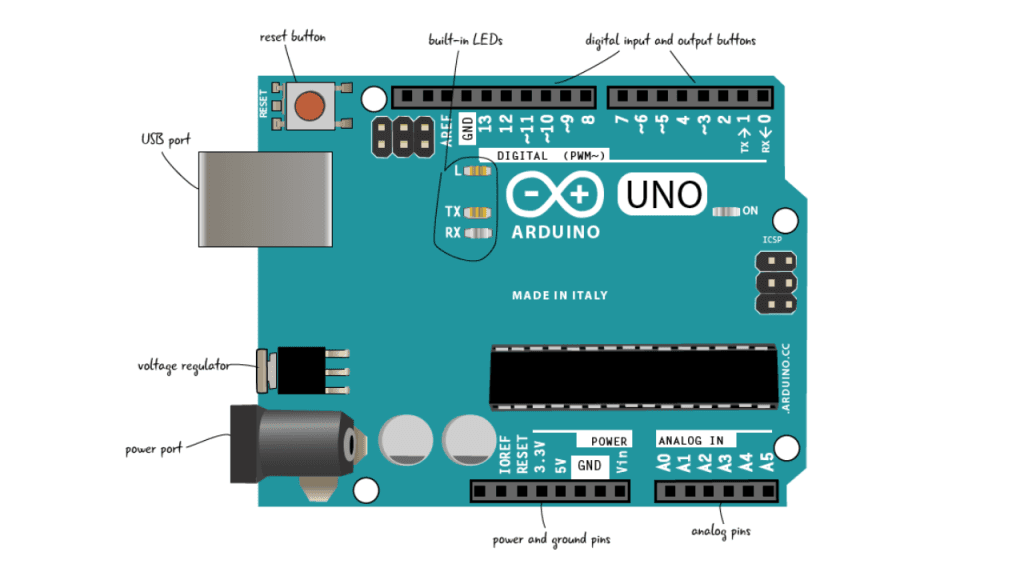
Understanding Your Arduino Board
The brain of your Arduino is a microcontroller—a small but powerful computer on a single chip. Let's explore the different Arduino boards available:
- Arduino Uno - The most popular board for beginners, featuring a robust design and excellent community support
- Arduino Mega - Perfect for larger projects, offering more pins and memory for complex applications
- Arduino Nano - A compact powerhouse, ideal for projects where space is at a premium
Choose Wisely!
While all Arduino boards share the same basic principles, each has its strengths. The Uno is recommended for beginners due to its forgiving nature and extensive documentation.
Essential Components
Digital Pins: Your Board's Input/Output Interface
These versatile pins are your primary way to interact with the physical world:
- Input/Output Flexibility - Each pin can be configured as input (reading buttons) or output (controlling LEDs)
- Simple Control - Easy to program with just
digitalWrite()for outputs anddigitalRead()for inputs - Digital Logic - Operates with HIGH (5V) and LOW (0V) states for clear, reliable control
Analog Pins: Reading the Real World
These special pins allow your Arduino to understand varying signals:
- Precise Measurements - Can read 1024 different voltage levels for accurate sensor readings
- Perfect for Sensors - Ideal for temperature sensors, light sensors, and potentiometers
- Real-world Interface - Converts continuous physical properties into digital values your code can use
Power System: Energizing Your Projects
The power pins are crucial for bringing your projects to life:
- 5V Output - The standard power source for most components in your projects
- 3.3V Output - A safer option for sensitive components that can't handle 5V
- Ground (GND) - Completes the circuit and provides a reference point for all voltage measurements
Always double-check your power connections! Incorrect power connections can damage your components.
Your First Arduino Project
Ready to bring your Arduino to life? Follow these simple steps:
Install the Arduino IDE
Download and install the latest version from the official Arduino website
Write Your First Sketch
Start with the classic "Blink" example to make the built-in LED flash
Connect Your Board
Plug in your Arduino via USB and select the correct board and port in the IDE
Upload and Watch
Click the upload button and watch your code come to life on the board!
Pro Tip:
The Arduino IDE comes with many example sketches. Explore them through File > Examples to learn from well-documented code!
Connect With Me
Support Our Work
Help us create more amazing content
Your contribution helps us create more amazing content. Thank you! 💖